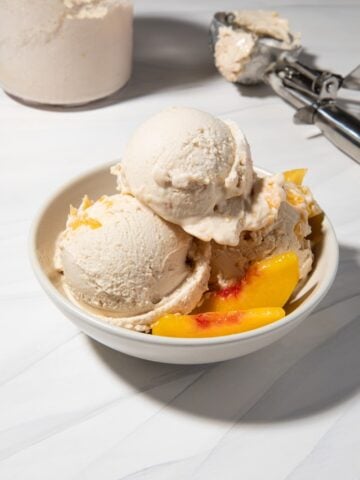
This Pumpkin Pie Protein Ice Cream is the perfect homemade ice cream recipe to make when it's hot out but you just can't wait for the fall season to begin! This delicious dessert is a dairy-free recipe made with simple ingredients & bursting with pumpkin flavor. Made in the Ninja Creami ice cream maker it's a simple fall dessert you'll want to make over and over again.

Creamy pumpkin ice cream is the perfect fall treat & a delicious way to enjoy the flavors of the season while also moving the needle forward towards your protein goals. This dairy-free recipe gets its ultra creamy texture from a mix of full fat coconut milk & almond milk.
If you love using your Ninja Creami machine to make homemade dairy free ice cream, you might enjoy this Chocolate Cookies & Cream recipe or this Vanilla Buncha Crunch recipe. I have fifteen additional dairy free protein packed creamy ice cream recipes you can make in your Ninja Creami to keep your sweet tooth satisfied all year long!
Why You'll Love This Recipe
It is a great way to enjoy the season. This Ninja Creami Pumpkin Ice Cream recipe is the best treat to enjoy this time of year if you love the fall but it's a little too hot to bake pumpkin bread!
It is better for you. Made with protein powder, no added sugars and dairy free milk, this recipe uses clean ingredients that are better for you.
It is delicious. And a great way to use up leftover pumpkin puree!

Ninja Creami Pumpkin Pie Protein Ice Cream Ingredients & Tested Substitutions
- Almond Milk. My preference is to use unsweetened almond milk; I like Califia Farms new 3 ingredient organic almond milk, however you may use sweetened almond milk, soy milk or your favorite dairy free milk if you like.
- Full-fat Coconut Milk. I find the canned coconut milk that works the best has a little bit of guar gum, which is a plant-based thickener. Thai Kitchen & Whole Foods in house brand coconut milk are my personal favorites, but if you’d like to stay away from gums, Trader Joe’s has a great option. I do not recommend using low fat coconut milk as it will make the ice cream base less creamy. NOTE: If you want to reduce calories, omit the coconut milk & replace it with additional almond milk. It won’t be as creamy but you will save on macros.
- Medjool Dates. For added sweetness, I use Medjool dates. You may replace them with 1 tablespoon of coconut sugar instead if you do not have any on hand.
- Vanilla Protein Powder. It’s important to note that you should enjoy the taste of your protein powder, or you won’t enjoy the taste of this ice cream! If you don’t have a protein powder you are loyal to, I recommend trying Equip Foods. My personal favorite is their grass fed beef isolate protein because it mixes super well and creates an incredibly creamy texture. You can use PRETTYDELISH to save 15% off your first order.
- Sea Salt. This is optional, but I always like to add a pinch of Celtic sea salt to the ice cream base.
- Pumpkin Puree. The key to making this pumpkin pie ice cream taste like the real deal is to use a high quality pumpkin puree. I do not recommend using pumpkin pie filling as it contains added sugar.
- Pumpkin Pie Spice. It wouldn't be pumpkin pie ice cream without it!
- Ground Ginger. This is optional but I found that a small amount of ground ginger adds really nice flavor.
- Gluten Free Cookies or Graham Crackers. I used Siete Foods Mexican Shortbread Cookies because they're made with minimal ingredients, but you could also use gluten free graham crackers if you like. If you're not gluten free, adding a biscoff cookie or two would be a delicious mix-in!

Ninja Creami Pumpkin Pie Protein Ice Cream Step by Step Instructions
- Make the ice cream base. Add the almond milk, coconut milk, dates, protein powder, pumpkin puree, pumpkin spice, ground ginger & sea salt to a blender. Blend until smooth. You may find that a few small bits of the dates remain if your blender is not high speed; this is ok. You can strain them out or leave them in, it’s up to you.
- Freeze the ice cream base. Pour ice cream mixture into the ninja creami pint container right up to the max fill line. Place storage lid on the container and freeze for a minimum of 8 hours. Ninja recommends at least 24 hours but I don’t have that kind of patience and find that 8 hours is plenty.
- Mix the ice cream. Follow the instructions for placing the frozen pint of the base mixture in your Ninja Creami. For your first spin you will use the “Lite Ice Cream” setting.
- Respin. Once the first spin is complete, you will need to respin the ice cream mixture in order for it to become the perfect texture as oftentimes you’ll see a formation of ice crystals & a more gritty texture after the first spin. My best creami prep tip is to add about 2-3 teaspoon additional almond milk, just enough to cover the top of the pint, before using the re-spin function. Place the outer bowl lid back on, fitting the bowl into the machine, & press the “re-spin” button.
- Add mix ins. Break the cookies or graham crackers up into pieces, then add the pieces to the ice cream base. Place back in the outer bowl with the lid secured, lock into place & choose the “mix-in” function. Add some additional cookie pieces & a sprinkle of cinnamon as toppings when serving.


Expert Tips & Tricks
- Ninja’s instructions state that you cannot use the “respin” feature followed by the “mix in” feature. I ALWAYS respin my dairy free ice cream, because it needs this in order to be creamy, and I use the mix in function after with no trouble.
- Before respinning, I recommend always adding a little bit more almond milk, or dairy free milk of choice. Just enough to almost cover the top of the pint container is perfect, about 2-3 tsp. This will help ensure the final result is super creamy.
- If you want to lower calories & feel good about eating the entire pint of high protein ice cream, replace the coconut milk with additional almond milk and omit 1 date in the base ice cream recipe. Note it won't be quite as creamy but this will be a low calorie option with around 31 grams of protein!
How To Store Ninja Creami Pumpkin Pie Protein Ice Cream
It is rare that you’ll leave ninja creami leftovers, but, if you do not finish your pint in one sitting here’s what you can do. Smooth over the ice cream that is left in the container with the back of a spoon. Place the lid back on & freeze. You will need to run the leftovers back through the same steps in the Ninja Creami when you are going to enjoy it again. Note that if you added mix ins, the machine will end up pulverizing them!
Did you have a chance to make this recipe? If so, please leave me a 5 star rating and review below. I always love and appreciate hearing from you!

Dairy Free Pumpkin Pie Protein Ice Cream (Ninja Creami)
Equipment
- Ninja Creami
- Blender
- Ninja Creami Pint Container
Ingredients
- ½ cup almond milk
- ½ cup coconut milk full fat
- ½ cup pumpkin puree
- 1-2 medjool dates for sweetness, can sub for 1 tablespoon coconut sugar or maple syrup
- 1 scoop vanilla protein powder I like Equip Foods Prime Protein
- 1 teaspoon pumpkin pie spice
- ¼ teaspoon ground ginger optional
- 1 pinch sea salt
Mix Ins
- gluten free shortbread cookies or graham crackers can sub for biscoff cookies if not gluten free
Instructions
- Make the ice cream base. Add the almond milk, coconut milk, dates, protein powder, pumpkin puree, pumpkin spice, ground ginger & sea salt to a blender. Blend until smooth. You may find that a few small bits of the dates remain if your blender is not high speed; this is ok. You can strain them out or leave them in, it’s up to you.
- Freeze the ice cream base. Pour ice cream mixture into the ninja creami pint container right up to the max fill line. Place storage lid on the container and freeze for a minimum of 8 hours. Ninja recommends at least 24 hours but I don’t have that kind of patience and find that 8 hours is plenty.
- Mix the ice cream. Follow the instructions for placing the frozen pint of the base mixture in your Ninja Creami. For your first spin you will use the “Lite Ice Cream” setting.
- Respin. Once the first spin is complete, you will need to respin the ice cream mixture in order for it to become the perfect texture as oftentimes you’ll see a formation of ice crystals & a more gritty texture after the first spin. My best creami prep tip is to add about 2-3 teaspoon additional almond milk, just enough to cover the top of the pint, before using the re-spin function. Place the outer bowl lid back on, fitting the bowl into the machine, & press the “re-spin” button.
- Add mix ins. Break the cookies or graham crackers up into pieces, then add the pieces to the ice cream base. Place back in the outer bowl with the lid secured, lock into place & choose the “mix-in” function. Add some additional cookie pieces & a sprinkle of cinnamon as toppings when serving.
Notes
Expert Tips & Tricks
- Ninja’s instructions state that you cannot use the “respin” feature followed by the “mix in” feature. I ALWAYS respin my dairy free ice cream, because it needs this in order to be creamy, and I use the mix in function after with no trouble.
- Before respinning, I recommend always adding a little bit more almond milk, or dairy free milk of choice. Just enough to almost cover the top of the pint container is perfect, about 2-3 tsp. This will help ensure the final result is super creamy.
- If you want to lower calories & feel good about eating the entire pint of high protein ice cream, replace the coconut milk with additional almond milk and omit 1 date in the base ice cream recipe. Note it won't be quite as creamy but this will be a low calorie option with around 31 grams of protein!


Leave a Reply