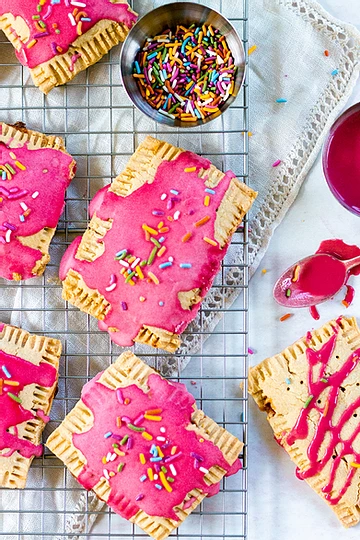
If you love the idea of a warm, flaky toaster pastry but want something that actually tastes homemade, these gluten-free pop tarts are going to be your new favorite baking project! They bake up beautifully golden brown with a tender, flaky crust and can be filled with whatever you’re craving: strawberry preserves, brown sugar cinnamon or chocolate hazelnut spread. Homemade pop tarts are the perfect nostalgic treat made with better ingredients than store bought!
I’ve always loved anything that falls into the “nostalgic but make it homemade” category, and these gluten-free pop tarts are exactly that. The tart dough comes together with a gluten-free flour blend, cold butter, and a few simple dry ingredients, and once it chills, it rolls out beautifully, almost like pie dough but a little more tender.
Cutting the dough into neat rectangles with a sharp knife or pizza cutter is oddly satisfying, and adding your favorite fillings (strawberry preserves, homemade strawberry jam, or even brown sugar cinnamon) makes the whole process feel like the grown-up version of assembling toaster pastries at the kitchen counter. It’s the perfect way to use pantry staples you already have while making something way more fun than anything on grocery store shelves.
If you love throwback-style treats, you’ll probably also love some of my other nostalgic recipes like my gluten-free Cosmic Brownies, Rice Krispies Treats, Lucky Charms treats or my M&M McFlurry ninja creami dupe. They all have that same “why does this taste like childhood but better?” energy and pair perfectly with a lazy Sunday baking session!
Why You'll Love This Recipe
- Flaky, tender crust every time. Cold butter + tapioca starch = a pastry dough that rolls out beautifully and bakes up golden and crisp around the edges.
- Customizable fillings. Swap in strawberry, raspberry, chocolate hazelnut, brown sugar filling… whatever your favorite flavor is you can use it here!
- Gluten-free made approachable. Using a food processor keeps the dough tender without overworking it which is perfect for beginners or anyone navigating celiac disease or food allergies.
- A fun homemade take on a nostalgic classic. Think toaster pastries, but with real ingredients and so much more flavor.
Please note this post contains affiliate links.

Gluten Free Pop Tarts Ingredients & Tested Substitutions
- Gluten-free flour blend (Bob's Red Mill Paleo Flour). I prefer to use Bob's Red Mill Paleo flour blend in this recipe because the flour blend gives the gluten free crust nice structure but you can also use plain almond flour instead if you prefer.
- Tapioca flour / tapioca starch. Tapioca starch adds softness, pliability, and helps keep the tart dough from cracking without the need for xanthan gum. Essential for a flaky crust.
- Coconut sugar. I prefer to use coconut sugar rather than white cane sugar to keep things refined sugar free, but you can feel free to use cane sugar if you prefer.
- Cold butter or vegan butter. Cold pieces are a must as they create small steam pockets that help the pastry puff and brown. If you are dairy free, I recommend using Miyokos Creamery for best results.
- Eggs. Bind the dough together and add richness. I do not recommend using flax eggs as I have not tested them, but an egg replacer will work if you would like a vegan version.
- Berries. I like to use strawberries combined with raspberries to make the filling, but you can use only strawberries or raspberries or add in blueberries or blackberries for a mixed berry version.
- Lemon juice. I like to add a splash of fresh lemon juice to the berries when cooking them down for a little brightness but you can use bottled lemon juice or omit entirely.
- Maple syrup. Real maple syrup sweetens the filling and helps it thicken into a jam.
- Powdered Monk Fruit or Powdered Sugar. If you aren't picky about refined sugars then go ahead and use powdered sugar for the icing. If you're looking to keep sugar low, try using powdered monk fruit instead.
- Milk. Any type of milk will do here. I like to use almond milk for dairy free but regular milk works just fine.
- Vanilla Extract. Opt for a high quality vanilla extract as opposed to imitation vanilla if you can. Vanilla bean paste also works really well if you want even deeper flavor.
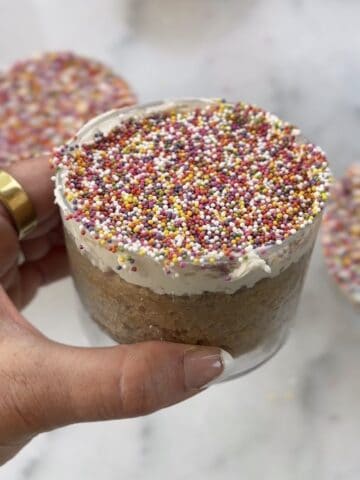
- Optional fillings & toppings: Homemade strawberry jam or strawberry preserves, brown sugar cinnamon filling, chocolate hazelnut spread, dye-free sprinkles if you want that classic pop-tart look
Gluten Free Pop Tarts Step By Step Instructions
1. Make the tart dough. Add the flours, coconut sugar, and sea salt to a food processor and pulse to combine the dry ingredients. Add the cold butter (or vegan butter) and pulse again until the mixture looks crumbly, like wet sand. Add the eggs and continue pulsing just until a tart dough starts to come together
2. Shape and chill the dough. Turn the dough out onto a piece of parchment paper and gently bring it together with your hands if needed. Divide into two equal pieces and shape each into a round disc. Wrap each disc tightly in plastic wrap, place on a flat surface, and chill in the fridge for at least 2 hours (up to overnight). If using vegan butter, chill for at least 5 hours so the dough stays firm.
3. Make the berry filling. While the dough chills, add the strawberries, raspberries (if using), maple syrup, a splash of lemon juice and tapioca flour to a small saucepan. Cook over medium heat, stirring occasionally, until the berries break down and the mixture thickens into a jammy strawberry filling. Remove from heat and let cool to room temperature before using.
4. Preheat the oven and prep the pan. When you’re ready to assemble, preheat your oven to 350° Fahrenheit. Line a cookie sheet or baking sheet with a piece of parchment paper and set aside so it’s ready for your pop tarts.
5. Roll out the first disc. Place one chilled disc of pastry dough on a lightly floured piece of parchment. Place another piece of parchment (or plastic wrap) over the top and use a rolling pin to roll the dough into a large rectangle about ⅛–¼ inch thick. If the edges crack, gently press them back together with your fingers.
6. Cut the dough into rectangles. Use a sharp knife or pizza cutter to trim the edges so you have a clean rectangle, then cut the dough into evenly sized inch rectangles. You’re aiming for pairs that will become the tops and bottoms of your homemade pop tarts. Transfer the rectangles to your prepared baking sheet in a single layer and place the sheet in the fridge to keep them cold.
7. Repeat with the second disc. Roll out the second disc the same way: between parchment, with a rolling pin, into a large rectangle. Cut into evenly sized rectangles to match the first batch. These will become the tops of each pastry.
8. Fill the pop tarts. Remove the first tray of rectangles from the fridge. Add a small spoonful of the cooled strawberry filling to the center of half of the rectangles, leaving a clean border around the edges so you can seal them.
9. Seal the edges and vent. Place a second rectangle of pastry dough over the top of each filled piece. Gently press around the edges of the pastry with your fingers, then crimp all the way around with a fork to seal. Use a toothpick or fork to poke holes in the top of each pastry so steam can escape while baking.
10. Bake until golden brown. Brush the tops lightly with egg wash if desired for shine, then bake on the middle rack for 20–25 minutes, or until the pop tarts are lightly golden brown around the edges. Rotate the cookie sheet halfway through baking so they cook evenly.
11. Cool on a rack. Remove the pop tarts from the oven and let them cool on the baking sheet for a few minutes before transferring them to a cooling rack. Let them cool completely to room temperature (or chill them) before adding the icing so it doesn’t melt off the top of each pastry.
12. Make the icing. While the pastries cool, add the powdered sugar to a small bowl, then whisk in the milk and vanilla extract until smooth. If you’d like a naturally pink icing, whisk in beet root powder (optional). Adjust with a little more milk or tapioca flour as needed to get a drizzle-able consistency.
13. Frost and serve. Spoon or drizzle icing over the top of each pop-tart, letting it drip down the sides. Add dye-free sprinkles if you like that classic toaster pastries look. Let the icing set, then enjoy right away or store in an airtight container in the fridge. You can gently reheat them in a toaster oven for that freshly baked, flaky crust texture.
Expert Tips & Tricks
- Keep the dough cold! Warm gluten-free dough cracks and softens quickly, so chill often and work with one disc at a time.
- Roll between parchment. It prevents sticking and makes it easier to transfer clean inch rectangles to the baking sheet.
- Don’t overfill. A small spoonful of strawberry filling goes a long way and prevents leaking.
- Seal well and vent. Press the edges firmly, crimp with a fork, and poke holes on top to keep the pastries intact as they bake.
- Cool completely before icing. If the pastries are warm, the drizzle icing will melt right off.
Storage Instructions
- Fridge: Store the pop tarts in an airtight container for up to 5 days. Keep them in a single layer or separate with parchment so they don’t stick.
- Freezer: Freeze unfrosted pastries in a single layer until solid, then transfer to a freezer bag. Freeze for up to 2 months. Thaw, then frost.
- Reheat: Warm in a toaster oven until the crust is crisp and the filling softens. Avoid slot toasters once they’re iced as the icing will melt right off.
Did you have a chance to make this recipe? If so, please leave me a 5 star rating and review below. I always love and appreciate hearing from you!

Homemade Gluten Free Strawberry Pop Tarts Recipe
Ingredients
For the Dough
- 2 cups Bob's Red Mill paleo flour blend can sub almond flour
- 2 cups tapioca flour
- 1 teaspoon sea salt
- 2 tablespoon coconut sugar can sub cane sugar
- 1 ⅓ cups butter or vegan butter for dairy free Miyoko’s Vegan butter works best
- 2 large eggs can sub an egg replacer like Bob's Red Mill
For the Filling
- 1 cup strawberries
- 1 cup raspberries optional, can sub in other berries or additional strawberries
- 1 tablespoon tapioca flour
- ⅓ cup maple syrup
- 1-2 tablespoons lemon juice
For the Icing (Optional)
- ½ cup powdered sugar or powdered monk fruit for refined sugar free
- 1 tablespoon milk of choice
- 1 teaspoon vanilla extract
- beet root extract or natural red food dye optional, for color
- dye free sprinkles for topping
Instructions
- Make the tart dough. Add the flours, coconut sugar, and sea salt to a food processor and pulse to combine the dry ingredients. Add the cold butter (or vegan butter) and pulse again until the mixture looks crumbly, like wet sand. Add the eggs and continue pulsing just until a tart dough starts to come together
- Shape and chill the dough. Turn the dough out onto a piece of parchment paper and gently bring it together with your hands if needed. Divide into two equal pieces and shape each into a round disc. Wrap each disc tightly in plastic wrap, place on a flat surface, and chill in the fridge for at least 2 hours (up to overnight). If using vegan butter, chill for at least 5 hours so the dough stays firm.
- Make the berry filling. While the dough chills, add the strawberries, raspberries (if using), maple syrup, a splash of lemon juice and tapioca flour to a small saucepan. Cook over medium heat, stirring occasionally, until the berries break down and the mixture thickens into a jammy strawberry filling. Remove from heat and let cool to room temperature before using.
- Preheat the oven and prep the pan. When you’re ready to assemble, preheat your oven to 350° Fahrenheit. Line a cookie sheet or baking sheet with a piece of parchment paper and set aside so it’s ready for your pop tarts.
- Roll out the first disc. Place one chilled disc of pastry dough on a lightly floured piece of parchment. Place another piece of parchment (or plastic wrap) over the top and use a rolling pin to roll the dough into a large rectangle about ⅛–¼ inch thick. If the edges crack, gently press them back together with your fingers.
- Cut the dough into rectangles. Use a sharp knife or pizza cutter to trim the edges so you have a clean rectangle, then cut the dough into evenly sized inch rectangles. You’re aiming for pairs that will become the tops and bottoms of your homemade pop tarts. Transfer the rectangles to your prepared baking sheet in a single layer and place the sheet in the fridge to keep them cold.
- Repeat with the second disc. Roll out the second disc the same way: between parchment, with a rolling pin, into a large rectangle. Cut into evenly sized rectangles to match the first batch. These will become the tops of each pastry.
- Fill the pop tarts. Remove the first tray of rectangles from the fridge. Add a small spoonful of the cooled strawberry filling to the center of half of the rectangles, leaving a clean border around the edges so you can seal them.
- Seal the edges and vent. Place a second rectangle of pastry dough over the top of each filled piece. Gently press around the edges of the pastry with your fingers, then crimp all the way around with a fork to seal. Use a toothpick or fork to poke holes in the top of each pastry so steam can escape while baking.
- Bake until golden brown. Brush the tops lightly with egg wash if desired for shine, then bake on the middle rack for 20–25 minutes, or until the pop tarts are lightly golden brown around the edges. Rotate the cookie sheet halfway through baking so they cook evenly.
- Cool on a rack. Remove the pop tarts from the oven and let them cool on the baking sheet for a few minutes before transferring them to a cooling rack. Let them cool completely to room temperature (or chill them) before adding the icing so it doesn’t melt off the top of each pastry.
- Make the icing. While the pastries cool, add the powdered sugar to a small bowl, then whisk in the milk and vanilla extract until smooth. If you’d like a naturally pink icing, whisk in beet root powder (optional). Adjust with a little more milk or tapioca flour as needed to get a drizzle-able consistency.
- Frost and serve. Spoon or drizzle icing over the top of each pop-tart, letting it drip down the sides. Add dye-free sprinkles if you like that classic toaster pastries look. Let the icing set, then enjoy right away or store in an airtight container in the fridge. You can gently reheat them in a toaster oven for that freshly baked, flaky crust texture.
Notes
Expert Tips & Tricks
- Keep the dough cold. Warm gluten-free dough cracks and softens quickly, so chill often and work with one disc at a time.
- Roll between parchment. It prevents sticking and makes it easier to transfer clean inch rectangles to the baking sheet.
- Don’t overfill. A small spoonful of strawberry filling goes a long way and prevents leaking.
- Seal well and vent. Press the edges firmly, crimp with a fork, and poke holes on top to keep the pastries intact as they bake.
- Cool completely before icing. If the pastries are warm, the drizzle icing will melt right off.
Storage Instructions
- Fridge: Store the pop tarts in an airtight container for up to 5 days. Keep them in a single layer or separate with parchment so they don’t stick.
- Freezer: Freeze unfrosted pastries in a single layer until solid, then transfer to a freezer bag. Freeze for up to 2 months. Thaw, then frost.
- Reheat: Warm in a toaster oven until the crust is crisp and the filling softens. Avoid slot toasters once they’re iced or the icing will melt right off.

Leave a Reply