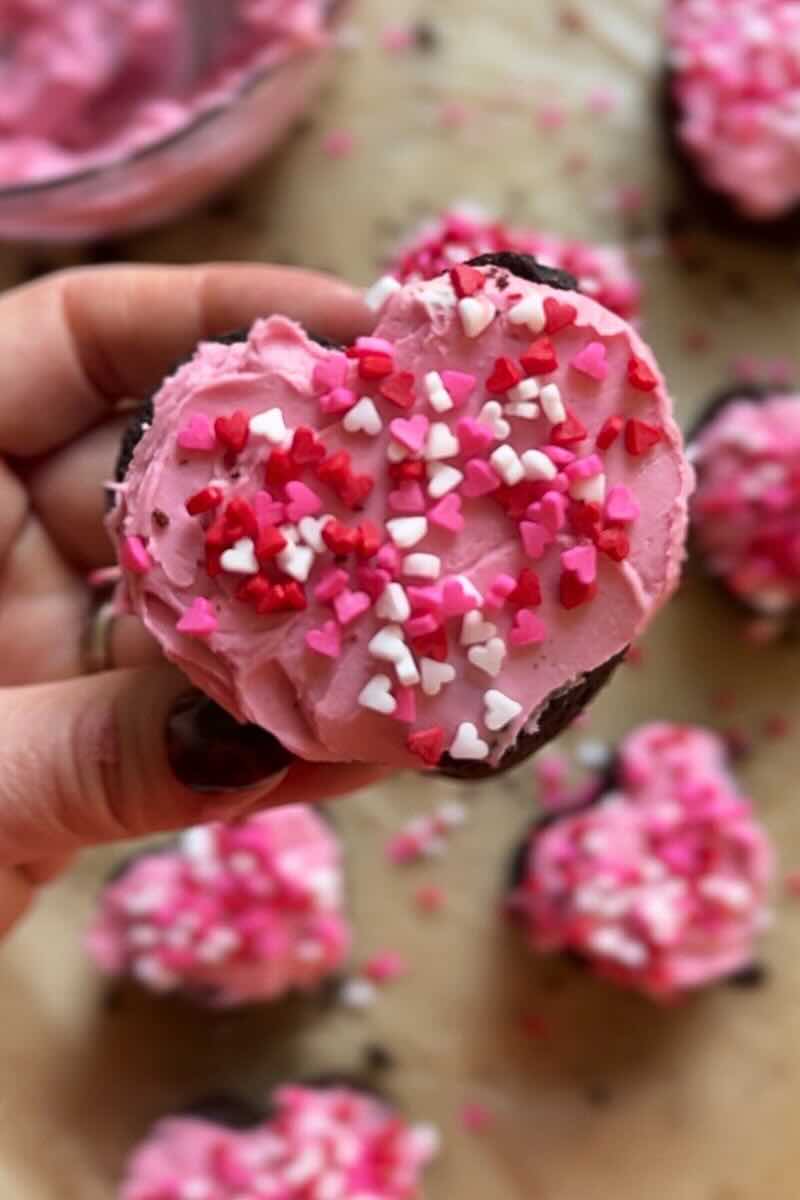
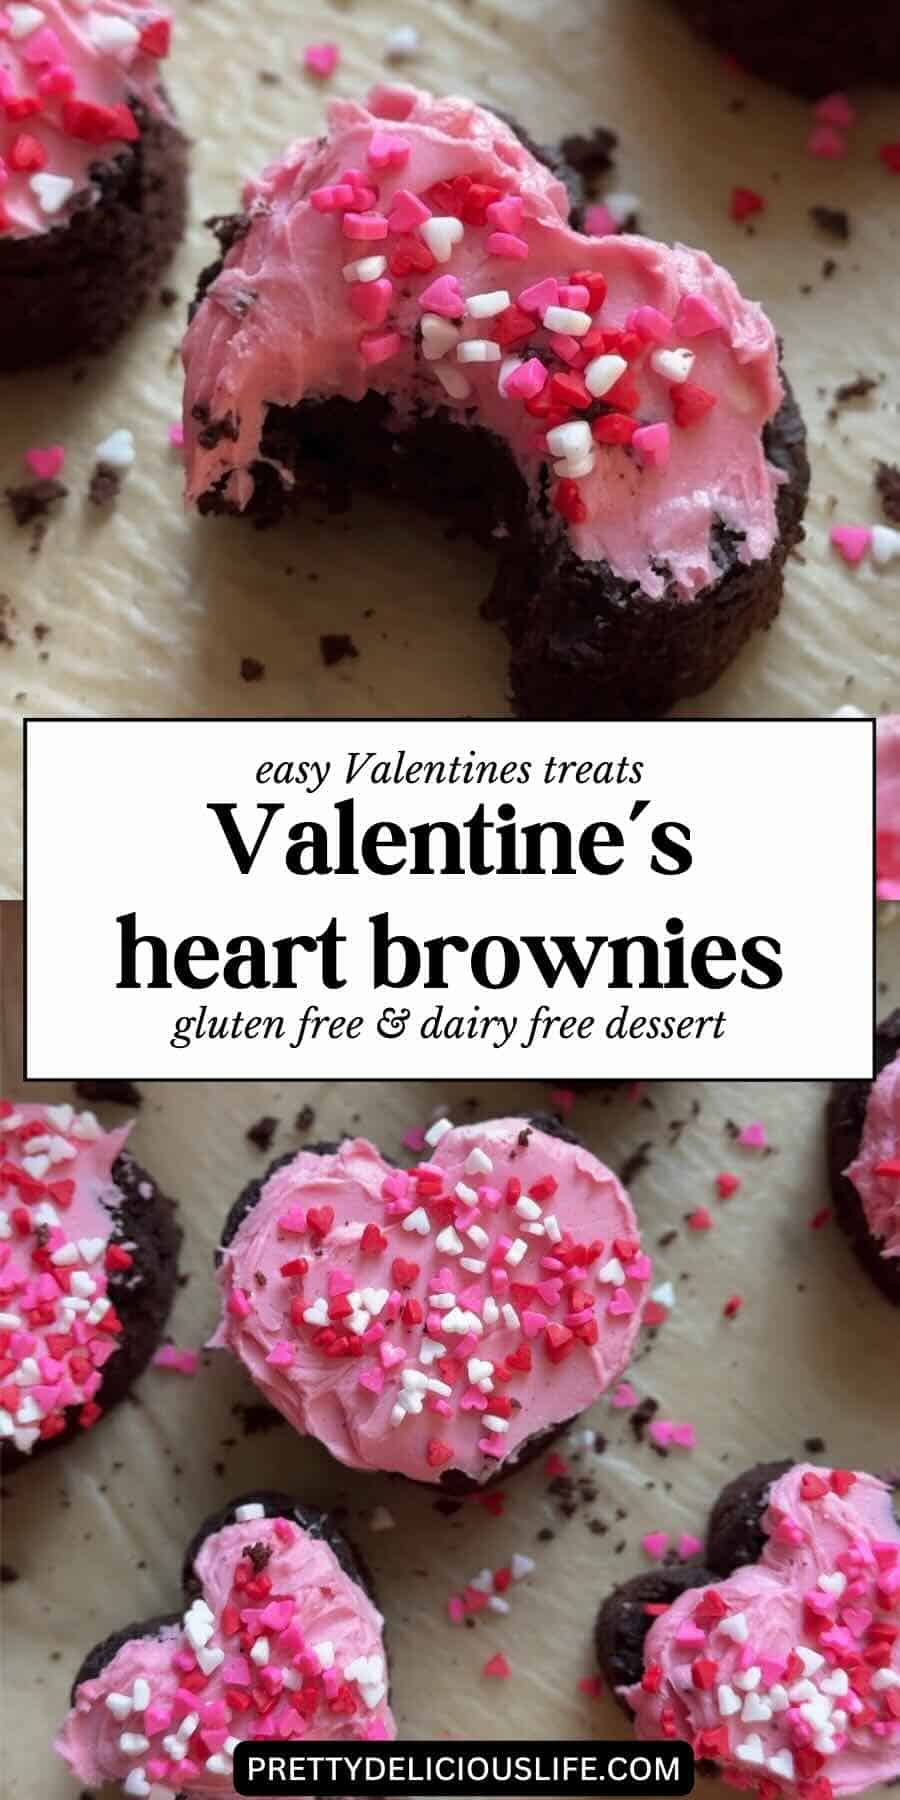
These Valentine’s Day Brownies start with a box mix, but I promise you’d never know it! My method makes them rich, fudgy, and bakery-worthy, which is exactly why people come to me for gluten-free desserts that actually taste amazing. It's the perfect easy treat for beginner bakers (and so fun to make with kids!) because there’s no complicated technique, just an easy heart-shaped frosted brownie that looks impressive every time.
Why You’ll Love These Valentine’s Day Brownies
- Box mix made better: Starts with a brownie mix, but my method makes the final result taste like rich, fudgy from scratch homemade brownies.
- Perfect for beginner bakers: No fancy techniques or confusing instructions, just a few easy steps to a delicious Valentines Day treat!
- Fun to make with kids: Cutting out heart-shaped brownies and decorating with sprinkles is the cutest Valentine activity and perfect for bringing to class.
- Fudgy, not cakey: These are true fudgy brownies with a soft center and chewy edges.
- Super festive with minimal effort: A cookie cutter and a quick topping turns this into the perfect Valentine treat.
- Customizable toppings: Keep it simple or go all out with chocolate ganache, pink frosting, and valentine sprinkles.
- Great for parties or gifting: These heart-shaped brownies look bakery-worthy but are so easy to make.
If you're looking for some more easy Valentine's treats to make try:
- Decadent Brownie Pudding
- 2 Ingredient Chocolate Mousse
- Sugar Cookies with Pink Frosting
- Banana Walnut Brownies
Please note this post contains affiliate links.

Valentine's Brownies Ingredients and Tested Substitutions
- Brownie mix. I use TruEats gluten free brownie mix but this recipe will work with whatever brownie mix you prefer. Just make sure you're using the ingredients intended for the box mix you have & read the instructions before baking.
- Eggs. My mix calls for one egg but flax eggs or egg replacer can be used for a vegan option.
- Oil. My mix calls for oil and my preference is to use avocado oil.
- Water. My mix calls for water but I use brewed coffee cooled to room temperature instead to enhance the flavor & fudginess.
- Vanilla Extract. I like to add a splash of vanilla to the mix to deepen the chocolate flavor but this is optional.
- Optional: extra chocolate chips for the brownie batter
- Chocolate chips (or chopped chocolate). If you're making the chocolate ganache, it all starts with a high quality chocolate chip or chocolate bar. I like to use dark chocolate but semi sweet chocolate or milk chocolate are perfect.
- Butter. My preference is to use grass fed butter but feel free use whatever type of butter you like. Vegan butter works as well for a dairy free option.
- Whole milk. You can use whole milk or warmed heavy cream for a thicker ganache. Using non dairy milk will work but start with a smaller amount and work your way up to ensure the ganache doesn't get too thin.
- Vanilla frosting. Instead of making the ganache, sometimes I like to frost the brownies instead. Choose your favorite store bought frosting and add some gel food coloring or natural food dye in pink or red to make it festive.
- Valentine sprinkles, white sprinkles, heart sprinkles for garnishing
Important: Follow the ingredient amounts listed on your brownie mix. The exact ratio varies between brands. This is the best way to get consistent results
Valentine's Brownies Step by Step Instructions
1. Preheat and prep the pan. Preheat the oven according to your brownie mix box directions and line your baking pan with parchment paper (this is the easiest way to lift out the baked brownies cleanly).
2. Mix the brownie batter. In a large bowl (or the bowl of a stand mixer if you prefer), combine the brownie mix with the eggs (or egg replacer), oil, and water (or coffee), plus a splash of vanilla extract if desired; mix just until combined to avoid cakey brownies. *Note: don't forget to use the ingredients your specific brownie mix calls for if you're not using the brand I use.


3. Bake the brownies. Pour the brownie batter into the prepared pan and bake until set according to package instructions; use a cake tester to check doneness (you want moist crumbs, not wet batter).


4. Cool completely. Let brownies cool to room temperature before cutting; warm brownies will crumble and you’ll lose the heart shape. Pop them in the freezer for about 15 to 20 minutes if you're impatient (like me!) and want them to cool faster.
5. Cut into hearts. Lift the cooled brownies out and place on a cutting board, then press a cookie cutter into the brownies to create heart-shaped brownies. Tip: Press straight down, don't twist the cookie cutter; twisting can tear the edges and make your heart-shaped brownies look messy instead of clean and sharp.


6. Make the chocolate ganache (optional). Add chocolate chips and butter to a heat-safe bowl, warm the milk until steaming (not boiling), then pour over the chocolate mixture; let sit for 2–3 minutes, then stir until smooth and glossy (if it’s too thick, stir in a tiny splash of warm milk; if it’s too thin, let it sit for a few minutes to thicken as it cools).
7. Make the pink frosting (optional). Tint vanilla frosting with gel food coloring or natural food dye until you reach your desired pink shade, then spread on top of the brownie hearts or pipe on using a piping bag.


8. Decorate and serve. Spoon ganache over the top of the brownies or frost them, then finish with Valentine sprinkles.


Expert Tips & Tricks for Perfect Valentine’s Day Brownies
- Use parchment paper every time. Lining your baking pan with parchment paper makes it easy to lift out the baked brownies.
- Do not overmix the brownie batter. Once the dry ingredients are incorporated, stop mixing. Overmixing can make brownies more cake-like instead of giving you fudgy brownies.
- Swap coffee for water for richer flavor. If your brownie mix calls for water, using coffee gives deeper chocolate flavor without making the brownies taste like coffee.
- Do not overbake. The best valentine brownies have moist crumbs on the cake tester, not a clean toothpick. Overbaking is the fastest way to get dry brownies.
- Cool completely before using a cookie cutter. Cooled brownies cut cleanly. Warm brownies crumble and you’ll lose that cute heart-shaped brownies look.
- Tip: Press straight down, don’t twist the cookie cutter. Twisting can tear the edges and make the heart-shaped brownies look messy instead of clean and sharp.
- Want clean hearts? Choose the right cutter. A cookie cutter with sharper edges gives cleaner brownie hearts than flimsy plastic ones.
- Ganache consistency matters. When making chocolate ganache, let the warm milk (or warmed heavy cream) sit on the chocolate chips for a couple minutes before stirring. If it’s too thick, add a splash of warm milk. If it’s too thin, let it cool for a few minutes.
- Use gel food coloring for frosting. Gel gives bold pink color without thinning the frosting like liquid food coloring can (perfect for that perfect Valentine look).
- Decorate while ganache is still warm. Sprinkle valentine sprinkles on top right away so they stick to the top of the brownie instead of sliding off later.
- Make it dairy-free if needed. Use dairy-free chocolates for the ganache and swap butter for vegan butter. The final result is still rich and delicious.
How to Store Valentine’s Day Brownies
- Store in an airtight container at room temperature for up to 3 days
- Or refrigerate for up to 5 days (just let them sit for 10 minutes before eating for best fudgy texture)
Did you have a chance to make this recipe? If so, please leave me a 5 star rating and review below. I always love and appreciate hearing from you!

Easy Valentine's Heart Brownies with Brownie Mix
Ingredients
- 1 box brownie mix I used TruEats gluten free brownie mix
- Ingredients listed on your brownie mix box to prepare (I use 1 egg, ½ cup avocado oil, and ¾ cup coffee instead of water)
- 1 teaspoon vanilla extract optional
For the Ganache
- 1 ½ cups chocolate chips or chopped chocolate
- 6 tablespoons butter or vegan butter for dairy free
- ½ cup whole milk or non dairy milk for dairy free
For the Frosting
- Vanilla frosting I used Miss Jones dairy free frosting
- Red Gel food coloring
For Decorating
- Heart sprinkles / Valentine sprinkles optional
Instructions
- Preheat and prep the pan. Preheat the oven according to your brownie mix box directions and line your baking pan with parchment paper (this is the easiest way to lift out the baked brownies cleanly).
- Mix the brownie batter. In a large bowl (or the bowl of a stand mixer if you prefer), combine the brownie mix with the eggs, oil, and water (or coffee), plus a splash of vanilla extract if desired; mix just until combined to avoid cakey brownies. *Note: don't forget to use the ingredients your specific brownie mix calls for if you're not using the brand I use.
- Bake the brownies. Pour the brownie batter into the prepared pan and bake until set according to package instructions; use a cake tester to check doneness (you want moist crumbs, not wet batter).
- Cool completely. Let brownies cool to room temperature before cutting; warm brownies will crumble and you’ll lose the heart shape.
- Cut into hearts. Lift the cooled brownies out and place on a cutting board, then press a cookie cutter into the brownies to create heart-shaped brownies.
- Make the chocolate ganache (optional). Add chocolate chips and butter to a heat-safe bowl, warm the milk until steaming (not boiling), then pour over the chocolate mixture; let sit for 2–3 minutes, then stir until smooth and glossy (if it’s too thick, stir in a tiny splash of warm milk; if it’s too thin, let it sit for a few minutes to thicken as it cools).
- Make the pink frosting (optional). Tint vanilla frosting with gel food coloring or natural food dye until you reach your desired pink shade, then spread on top of the brownie hearts or pipe on using a piping bag.
- Decorate and serve. Spoon ganache over the top of the brownies or frost them, then finish with Valentine sprinkles.
Notes
Expert Tips & Tricks for Perfect Valentine’s Day Brownies
- Use parchment paper every time. Lining your baking pan with parchment paper makes it easy to lift out the baked brownies.
- Do not overmix the brownie batter. Once the dry ingredients are incorporated, stop mixing. Overmixing can make brownies more cake-like instead of giving you fudgy brownies.
- Swap coffee for water for richer flavor. If your brownie mix calls for water, using coffee gives deeper chocolate flavor without making the brownies taste like coffee.
- Do not overbake. The best valentine brownies have moist crumbs on the cake tester, not a clean toothpick. Overbaking is the fastest way to get dry brownies.
- Cool completely before using a cookie cutter. Cooled brownies cut cleanly. Warm brownies crumble and you’ll lose that cute heart-shaped brownies look.
- Tip: Press straight down, don’t twist the cookie cutter. Twisting can tear the edges and make the heart-shaped brownies look messy instead of clean and sharp.
- Want clean hearts? Choose the right cutter. A cookie cutter with sharper edges gives cleaner brownie hearts than flimsy plastic ones.
- Ganache consistency matters. When making chocolate ganache, let the warm milk (or warmed heavy cream) sit on the chocolate chips for a couple minutes before stirring. If it’s too thick, add a splash of warm milk. If it’s too thin, let it cool for a few minutes.
- Use gel food coloring for frosting. Gel gives bold pink color without thinning the frosting like liquid food coloring can (perfect for that perfect Valentine look).
- Decorate while ganache is still warm. Sprinkle valentine sprinkles on top right away so they stick to the top of the brownie instead of sliding off later.
- Make it dairy-free if needed. Use dairy-free chocolates for the ganache and swap butter for vegan butter. The final result is still rich and delicious.
How to Store Valentine’s Day Brownies
- Store in an airtight container at room temperature for up to 3 days
- Or refrigerate for up to 5 days (just let them sit for 10 minutes before eating for best fudgy texture)
Leave a Reply